Showing posts with label landscape design. Show all posts

5.04.2014

SIZING AN OUTDOOR PATIO

Every year this question ultimately comes up in my landscape design studio: "How large should I make a patio for a certain number of people?" I found a handy document from Concrete Network with their suggestions, then put my own graphic spin on it below. If you also have suggestions, please leave them in the comments below.


UDPATE on 5.17.14: While discussing this on LinkedIn, John Welch of 3G Design brought up some additional important points related to this topic that I wanted to share:

John writes...The dimensions suggested...seem about right as far as accommodating tables and chairs is concerned. This is not necessarily the whole story, however. I always try to be generous and allow for a couple of extra places and I try to make sure there is clear access to and from the house (if the terrace adjoins it) unencumbered by furniture. Ideally you would be able to walk around the table too without stepping off the paved area or being crushed against a wall.

The other factor to consider is that of proportions. Tiny terraces look odd next to wide, high facades and conversely huge expanses of paving can look out of places against more modest dwellings. Clever design can only do so much to ameliorate this. So, there are aesthetic as well as practical considerations. I also like to place at least a narrow band of planting between house and terrace to soften this transition between horizontal and vertical surfaces. There may, of course, be budgetary restraints which can limit how big an area you can pave and what you use as a surface treatment.

Well said John.  Thanks!


If you're interested in more articles like this one, plus would like to receive a free copy of my theme garden eBook, please sign up for email updates here.

4.05.2014

PLANTING DESIGN TIPS

Though I officially learned planting design in college, I didn't begin my real education until I began creating my own garden. These are a collection of tips I've learned over the last twenty years in both capacities. 


If you'd like more information on some of these tips please check out these posts:

Drawing Tree Forms
Make Your Garden Pop with Texture
Texture in the Garden

I hope to expand on additional tips in the future...so keep a look out for those.

I'd love to hear your planting design tips too. Please share one in the comments below.


If you're interested in more articles like this one, plus would like to receive a free copy of my theme garden eBook, please sign up for email updates here.

3.29.2014

GARDEN INSPIRATION


As you may know, I enjoy exploring garden blogs. I even keep a board of them on Pinterest.  Once in a while I love pulling out a few for extra inspiration. Since it's spring and we're aching to get outside (at least those of us in the cooler parts of the world) I encourage you to start dreaming.  Here are four to get you started:

I not only enjoy finding inspiration from blogs, but also from you. A couple of months ago I shared a survey to get feedback on possible topics I could cover on my blog.  For those that didn't participate, I'd love your thoughts. Here is a link to that survey once again: GARDEN DESIGN SURVEY.


If you're interested in more articles like this one, plus would like to receive a free copy of my theme garden eBook, please sign up for my email updates here.


3.19.2014

DRAWING TREE FORMS

There are three design elements to consider when creating a planting design: form, texture and color.

Each plant you choose encompasses these characteristics in different ways. Though you should consider all of these it is important to know that form is the most consistent, then texture and finally color. 

A good planting design should start with a strong composition of forms in elevation (standing in front and looking straight on). Trees, shrubs, and perennials all have forms. Below are only some examples of tree forms. Additional ones, not included below, are vase-shaped, weeping, and irregular. 

To design in elevation it's helpful to also be able to DRAW in elevation. I've included a video below to show my simple technique, so you can begin the joy of designing right away. 

A design hint: Take a photo of your house, throw on a piece of tracing paper, then try drawing some of these plant forms on top to see what combination might work for your landscape. Don't forget to layer them too (some tall plants in back, then medium and smaller plants in front).  Enjoy!


If you're interested in more articles like this one, plus would like to receive a free copy of my theme garden eBook, please sign up for my email updates here.

2.22.2014

HOW TO LABEL PLANTS

When we create a landscape design it's important that we communicate what's on the plan. The plants are one of the most important elements and typically take up most of the design, so an organized system to labeling them is a must. A beautiful design can look messy and unprofessional if plant labels are not laid out well. Below are the rules I use when labeling plants in plan view (looking from the sky down towards the garden).


If you're interested in more articles like this one, plus would like to receive a free copy of my theme garden eBook, please sign up for email updates here.

1.19.2014

HOW TO GROUP PLANT SYMBOLS

For those that enjoyed my How to Draw a Plant Symbol tutorial, here is the next step...grouping plant symbols.  A general rule of thumb for planting design is to group plants in odd numbers (though once you've exceeded eight in a group you can drop this rule). I've included some steps below, plus a short video on how to draw these plant groups.


HOW TO GROUP PLANT SYMBOLS 
1. Using a circle template, draw your plants using circles. Don't be afraid to overlap the circles a bit (so in real life your plants form a mass).
2. Use a felt tip marker to outline the outside edge of the group (with whatever plant edge you'd like...see some examples above). Don't ink the lines that overlap. This technique emphasizes the plant group (rather than the individual plants). Graphically, it's also easier to read. It's okay if your pencil lines show, since the ink will dominate.
3. Use a gray chisel tip marker to add ground shadows (all on the same side...typically the bottom right or bottom left).
4. Note that cross-hairs in the middle of the plant indicate it's proposed, while a dot indicates existing.
5. Only group plants graphically that are all the same species.

If this is too difficult to visualize, please visit my short video here:


If you're interested in more articles like this one, plus would like to receive a free copy of my theme garden eBook, please sign up for my email updates here.

12.30.2013

DREAMING OF BEDLINES

How do I stop the madness of crazy bedlines? These are the lines that slither through the lawn without a care in the world. Those new to landscape design often follow this approach: place plants in the ground, then outline each plant on the edge with a bedline, which results in a wiggly array of chaos (see below).

I encourage you to take a step back and think about how landscape design is about creating space.  We create the space first (the lawn or patio, for instance), then use the plants to reinforce that space.  You can read more about this idea in my Keep it Positive in the Garden post. The bedline is the edge of that space, so it needs to be purposeful to reinforce whatever shape you are creating for the lawn or patio.


Catherine from Garden Drum has a great way to think about this concept. She describes the garden space we are creating as the doughnut hole, while the actual doughnut is the planting bed reinforcing it. The bedline would be the outer edge of the doughnut hole.

There is another benefit to stronger bedlines...less maintenance and easier mowing.  Imaging trying to edge all those wiggly curves with a spade, or worse, trying to mow into those tight little crevices. Eek.


If you're interested in more articles like this one, plus would like to receive a free copy of my theme garden eBook, please sign up for my email updates here.

11.03.2013

DRAWING A TREE

A fun way to design a landscape is in elevation - or a straight-on view as if you were standing and looking at it (vs. a plan view that is looking down from the sky). When designing in elevation take note of how all plants have a unique form. Some are circular, oval, columnar, pyramidal, weeping or even irregular. You can read more about plant forms here.

Take a photo of your house, lay tracing paper over it, then try drawing a composition of different plant forms in front of it. Think about accentuating your entry, while also framing your house overall.  Mix different forms, plus layer them (2-3 rows of plants is much more interesting than one). Click here to see an example.

Below is a simple tutorial of how to draw a tree, so you can focus on designing, rather than worrying about your drawing skills (anyone can draw a tree, really).  I also have a slightly different format of this graphic tutorial available for purchase as a digital file here or a hard copy here.


If you're interested in more articles like this one, plus would like to receive a free copy of my theme garden ebook, please sign up for my email updates here.

7.23.2013

MAKE YOUR GARDEN POP WITH TEXTURE

Planting design is a science and an art. The science takes into consideration what your plants need to thrive, while the art is about composition. The latter is challenging for most and often hinders many to experiment in the garden initially.

The good news is that there are some planting design guidelines to help us along. Three things to consider when arranging your plants are form, texture and color. These should be considered in the same order...form first, texture, then finally color.  Form is the most consistent, while color is the most fleeting.
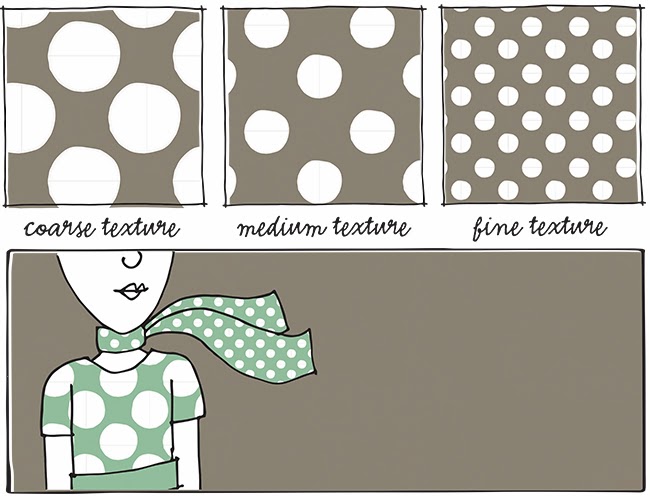
I'd like to jump right into texture, since this seems to be the most confusing, yet can be so powerful. Texture in plants is typically the size of the leaf. The collection of a plant's leaves or even the size of the stems can also weigh into texture, but for simplicity's sake, let's just focus on the leaves.


Course texture is a larger leaf, while fine texture is a smaller one. It is the combination of different textures that makes a planting design have contrast and, thus more punch.  If you have too much of one texture, your overall composition will be dull.  I often see too much fine texture (like the combination of ornamental grasses and daylilies).  Think about how you can mix in more course (large) leaves in with your fine (small) leaves.

This same concept is true in other areas of design too, such as architecture, interior design and even textile design. I often mix pattern textures in fabric. It can be as simple as mixing a large-scale pattern with a small one.  Yes, you can pair patterns in your wardrobe as long as you mix fine (small scale) with course (large scale)...just as you would with plants.


Illustrations are nice, but real plant combinations can show the true power of mixing textures correctly. Take a look at how the different scale of leaves complement each other below. Each plant pops more because of it's partner. The amazing thing is that we often focus on color when planning our gardens, but if you have a great combination of textures, color plays a secondary role. Your garden will always look good whether it's blooming or not. Note how there are few colors in the images below, yet there is strong contrast.


Next time you're at a nursery choosing plants, bring the containers together and make sure they complement each other with different textures. If you're missing a course texture, keeping looking for the right plant. Even after you've planted them in your garden don't be afraid to continually tweak your design each season. I am constantly moving plants around and adding new ones to get the right texture combinations.

Texture is an amazing way to add contrast and spark to your garden. I encourage you to start looking at the size of leaves and pairing them in different ways.  Experiment and see what happens.
If you'd like to read more articles like this one, please sign up for my email updates here.